Altering cart widget functions by embedding Subbly Javascript
 Updated
by Binu Francis
Updated
by Binu Francis
Trying to customize the cart widget to behave a certain way by default? Subbly's cart widget is incredibly powerful yet flexible tool, and allows you to embed code snippets within your websites' pages to make it work per your requirements!
Introduction
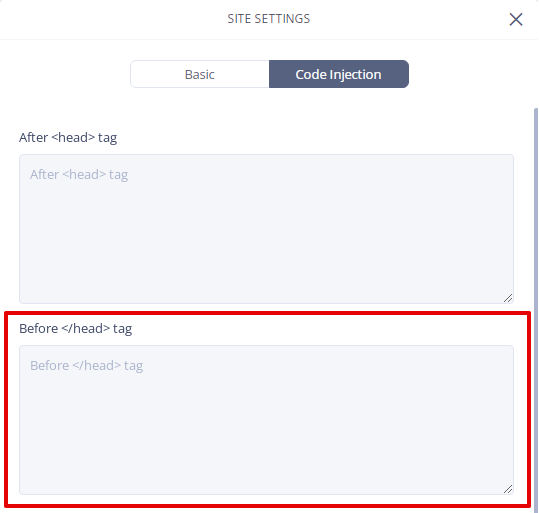
You can add the Javascript code snippets shared below to your website pages' head section, before the </head> tag. If you're using the Subbly website builder, you can add the code within Dashboard > Site settings > Code Injection, and paste the code snippet within the Before </head> tag section.
On 3rd party websites, you can use similar Code Injection or Code embed functions that allow you to add custom Javascript code to your pages.
Now that we know where the code snippets are added, let's proceed to explore all the different functions that can be performed on the cart widget, and code snippets associated with those functions.
How to replace cart icon or buttons on your website
If you wish to replace the cart icon or cart button on your website with another one, you can do so by assigning .subbly-cart and .subbly-cart-product-count parameters to your cart button elements on the page, like so -
<a href="#" data-subbly-cart-toggle class="subbly-cart">
  <span class="subbly-cart-product-count"></span>
  <img src="your-icon-image-url" alt="Cart Icon">
</a>
By adding this code to your webpage, you will be able to display a button that toggles the Subbly cart widget. The .subbly-cart class is used to target the button element, and the .subbly-cart-product-count class is used for the item count in the cart widget.
How to add Subbly's floating cart button
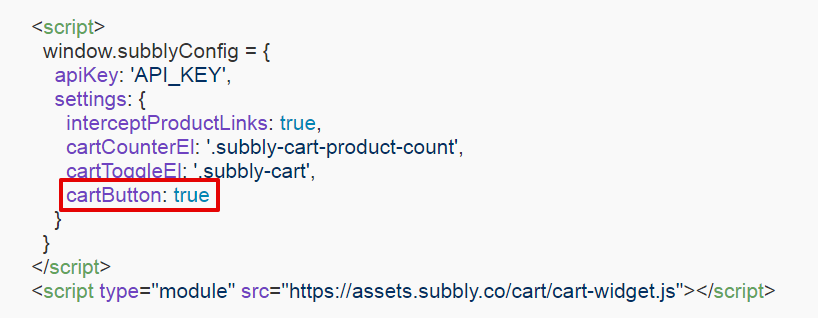
If you don't have a cart button on your website(or just simply wish to switch over to Subbly's floating button) you can enable it by setting the cartButton: true within the cart widget installation code.
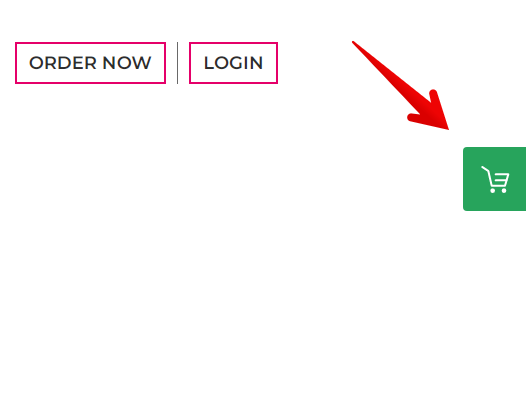
Once added, the floating cart button shows up on the top right side of your website screen, and stays in the same location (i.e. floats) even as you're scrolling, so it always stays accessible.
Setting up Subscribe/Buy buttons without checkout URLs
You might have been linking the Subscribe and Buy buttons on your site directly with your product's checkout URL - and this triggers the checkout widget, since interceptProductLinks: true is set in the cart widget code. This effectively makes it so Subbly intercepts the product checkout URLs from going to checkout pages directly, and instead adds the product to the cart and opens up the cart widget.
There's another way to add products to cart and open the cart widget - it's by adding the following code to your Subscribe/Buy buttons -
<a href="#' data-subbly-product=(PRODUCT_ID)></a>
Pre-defining product quantity and addon choices
If you wish to have a certain quantity of one-time products added to the cart, or have the specified one-time products and quantity added onto a subscription that's also in the customers' cart, that can be done by passing on the following parameters in the button code -
data-subbly-product : to specify the product ID you want to be added
data-subbly-quantity : to specify the quantity of the product specified in data-subbly-product
data-subbly-addon : to specify if the product specified in data-subbly-product should be attached as an addon
data-subbly-duration : to specify whether addon should be added as a one-time addition to the subscription, or forever/recurring basis. Values can be once or forever.
Resulting code can look like so -
<a href="#' data-subbly-product=27456 data-subbly-addon data-subbly-duration=forever>
 </a>
Pre-apply a coupon to the cart for all products on the page
If you have a separate landing page or shop page for a specific promotion, and wish to have a coupon automatically applied when customers click on the Subscribe or Buy buttons on that page, you can add the following code to the Head section of that page -
<script>
  window.addEventListener('subbly-cart-initialized', () => {
    subblyCart.applyCoupon(YOUR_COUPON_CODE)
  })
</script>
Setting cart widget language
If you want to set the cart to default to a certain translation language you've added in your storefront translation settings, you can do so by adding the language short code in the code snippet below and adding it to the head section of your page -
<script>
window.addEventListener('subbly-cart-initialized', () => {
 subblyCart.setLanguage('fr')
 })
</script>
You can also pass on the language shortcode as a parameter in your checkout URL to load the cart widget in that language, for example, https://subbly.co/checkout/buy/2428/?lang=fr
Similarly, you can also add the language parameter within your page's html tag to make it load the checkout widget in the required language, for example, <html lang="fr">
Setting cart currency
You can set the currency used on the cart widget by adding the following code snippet to the head section of the page -
<script>
  window.addEventListener('subbly-cart-initialized', () => {
 subblyCart.setCurrency('USD')
}
</script>
Uploading a custom font
You have a set of pre-loaded fonts on Subbly you can choose to add to your cart widget under cart settings, but if you need to add a custom font - you can add it by adding it to your style sheet(in the head section) like in any of the ways shown below -
<style>
  #subbly-cart-widget {
    --font-primary: "YourFontName" !important;
  }
</style>
Or
<style>
@font-face {
    font-family: "YourFontName";
    src: url("path/to/your/font.woff") format("woff");
  }

  .subbly-widget {
    font-family: "YourFontName";
  }
</style>
If you're facing any problems while setting up these scripts, please feel free to contact support for assistance.